food

3 no-bake Christmas desserts you can throw together with less than 5 ingredients.

The first time my British husband visited my hometown of Dubbo was also his first Aussie Christmas. 

We stepped off the plane and the 42-degree heat smacked us right in the face.

‘I don’t think we’ll be having roast potatoes and plum pudding this year, will we?’ he smiled.

So many recipes for traditional Christmas desserts involve some baking, but when it’s this hot outside, who wants to turn the oven on?

And while we’re at it, who wants to get all tricky “deconstructing” a pavlova or making a fancy pudding that requires 30 steps? Ain’t nobody got time for that.

These three recipes tick all the boxes. They’re no-bake, made with just a handful of cheap and cheerful ingredients, and they’re totally delicious. Not to mention bound to impress even the fussiest family members.

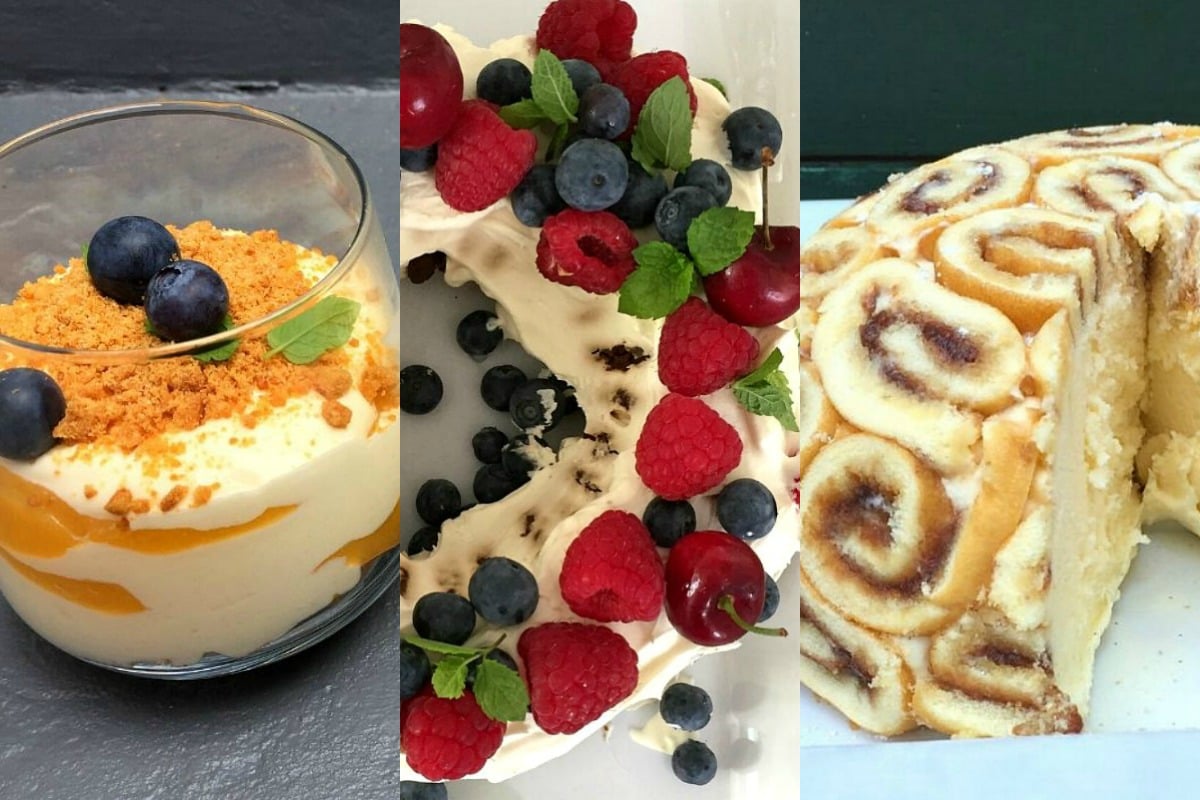
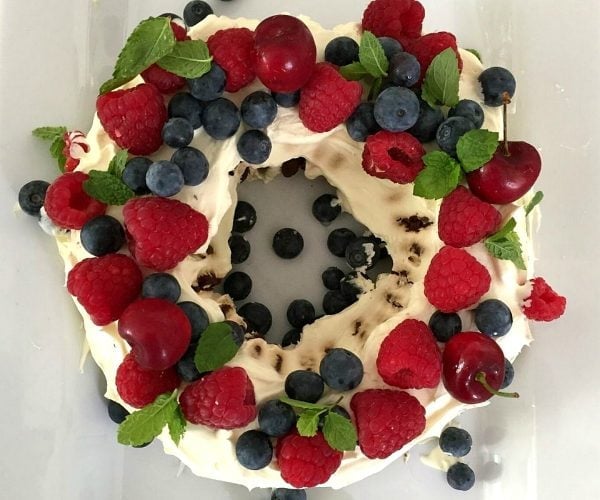
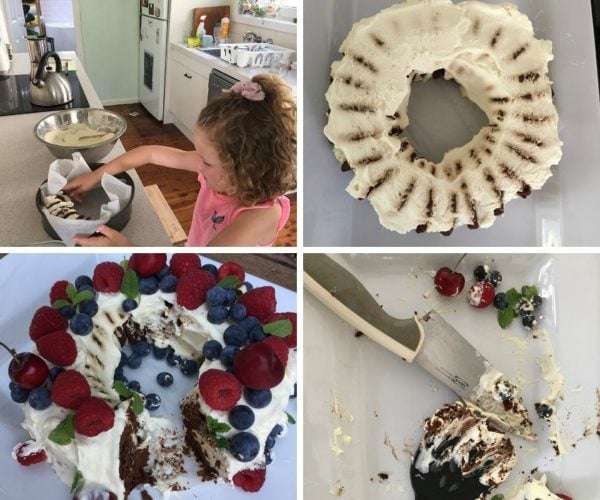
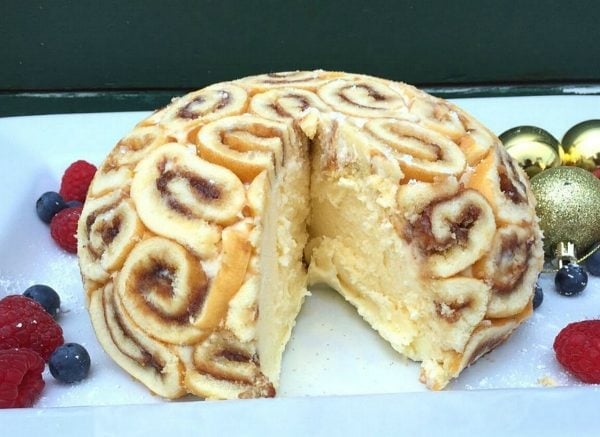
1. Chocolate Ripple Cake.

With just two main ingredients, this recipe literally could not be easier. 

My five-year-old daughter loves helping me put this cake together. 

Prepare it the day before you want to eat it, as you need to let it set overnight to allow the cream to soak into the biscuits. The result is a cakey texture with lovely layers from the biscuits.

Chocolate-Ripple-Cake
Chocolate Ripple Cake. Image: Supplied.
ADVERTISEMENT

Ingredients

  • 250g Arnott’s Chocolate Ripple biscuits (or use choc chip biscuits).
  • 600ml thickened cream.
  • 2 tbsp icing sugar.

Method

  1. Line a small cake tin with a large sheet of baking paper, with plenty of paper hanging over each side. Pour 500ml of the cream and the icing sugar into a large mixing bowl and whisk with electric beaters until thick (store the leftover cream in the fridge to use before serving).
  2. Grab a biscuit and slather a tablespoon of cream onto one side, then sandwich the next biscuit into it. Place the biscuits on their side in the tin. Continue adding cream and sandwiching the biscuits together, to form a ring around the outside edge of the cake tin. Cover the top of the ring with the rest of the cream so that the biscuits are all covered.
  3. Cover the tin with plastic wrap and place in the fridge overnight (or up to 24 hours) to set. When ready to serve, remove the plastic wrap and carefully lift the cake out of the tin (using all four corners of the baking paper – this cake is delicate!) and place it onto a serving platter or cake stand. Snip the visible baking paper away, but don’t try to remove the paper sitting underneath.
  4. Grab your leftover 100ml of cream and beat until very thick. Use this as ‘icing’ to carefully cover the sides and centre so that you can’t see the biscuits (don’t worry about the top as it will be covered in fruit). Be gentle as the cake is very soft now.
  5. Decorate with fresh berries, chocolate shards, mint leaves or anything else that takes your fancy. Or just leave it plain! Slice and serve immediately.

Serves: 8.

Prep time: 10 minutes, plus overnight to set.

Mix it up: You could add food colouring to the cream if you wanted to. Use different biscuits such as Ginger Nut biscuits. Or use a plain biscuit and add some lemon curd before the cream. Add some sprinkle or flaked chocolate. Double the recipe to make a mega cake. Cover the finished cake with berries or cherries, anything goes.

Ripple cake
My daughter loves helping me create (and demolish) this dessert. Images: Supplied.
ADVERTISEMENT

2. Mango Layered Cheesecake.

This one should be called a ‘cheat cake’ instead of a cheesecake, as it requires ZERO cooking time. 

Serving individual desserts in a glass like this allows the beautiful layers to shine.

Mango-Layered-Cheesecake
Mango Layered Cheesecake. Image: Supplied.
ADVERTISEMENT

Ingredients 

  • 2 mangoes, peeled, diced and pureed until smooth.
  • 250g Digestive Biscuits, Ginger Nut biscuits or shortbread, crushed into crumbs.
  • 100ml thickened cream.
  • 1/3 cup icing sugar.
  • 250g cream cheese, softened to room temperature.

Method

  1. Place the cream into a large mixing bowl and whisk on medium speed with electric beaters until thick.
  2. Add the icing sugar and softened cream cheese to the bowl. Mix on low speed until combined.
  3. Sprinkle half of the biscuit crumbs evenly into the base of four small serving glasses. Dollop with half of the pureed mango, then half of the cream. Repeat the mango and cream layers, finishing off with the rest of the biscuit crumbs.
  4. Chill until ready to serve.  

Serves: 4.

Prep time: 20 minutes.

3. Swiss Roll Pudding.

If you’ve got access to a knife and a spoon, this sweet treat is well within your reach. Just ice cream and jam rolls are all you need for this impressive dessert. Prepare this the day before you want to eat it, as it requires setting time in the freezer.

I used the pack with the small jam rolls in it, but you could use the larger jam roll if you prefer. You could also mix it up by using the chocolate roll option instead.

Feel free to customise the ice cream choice too. You could layer it up using your favourite flavours or go for the classic neapolitan tri-colour treat. Why not add mix-ins like M&Ms or choc chips?

My son really summed it up when he said it looked like a tasty brain. You can’t beat that for an endorsement can you?

Swiss-Roll-Pudding
Swiss Roll Pudding. Image: Supplied.
ADVERTISEMENT

Ingredients

  • 500g small jam rolls, thinly sliced.
  • 2L ice cream of choice (I chose a good quality vanilla), left on the bench to soften. 

Note: Depending on the size of your bowl you may not need to use up all of your ingredients, so feel free to eat them yourself in private after you’ve finished preparing the pudding, like this mum did.

Method

  1. Spray a pudding basin, glass bowl or cake tin with oil spray, and then double line it with two very large pieces of plastic wrap. You want to have a lot of overhang that you can grip on to later to pull the pudding out of the tin. Use the sliced jam rolls to line first the bottom and then the sides of the pan. Save any leftover slices (if you have them) to use for the base layer.
  2. Scoop the softened ice cream onto the top of the jam rolls and smooth the top with a spatula.
  3. Layer any leftover slices of jam roll on to the top of the ice cream (if you have them), cover the exposed ice cream layer with plastic wrap and place in the freezer overnight (or at least 4 hours).
  4. When ready to serve, remove from the freezer and discard the top layer of plastic wrap. Allow to stand for 5-10 minutes. Use a knife to loosen the edges if you have any trouble inverting the pudding (you can also place it into a bowl of hot water for 30 seconds if you are finding it hard to get it out). Invert the pudding onto a plate or platter and slice into chunks. Serve immediately. Store any leftovers back in the freezer.

Serves: 12.

Prep time: 20 minutes, plus overnight to set.

Will you be trying any of these desserts this Christmas? Let us know in the comments.